Advanced iPhone Tutorial
Tutorial Information:
For 3D Studio Max
Version 8.5 used
Difficulty: Intermediate
Emphasis: Modeling only (texturing tutorial)
This is a second version with an emphasis on modeling with Editable Poly instead of Mesh, for more detail and further texturing possibilities.
You should acquire some knowledge of Max’s interface before using this tutorial. All images in this tutorial can be clicked on, or downloaded or dragged to a new tab to enlarge to full visibility.
Purchase the Complete iPhone model from this tutorial at Turbosquid!
To begin this tutorial, first download the reference images of the iPhone- Front & Side:
You can create your own setup file by making two planes to put the
reference images on in Max. For the front reference plane, I use
dimensions 4.5″ x 2.14″ with a .1″ plane thickness.
Step 1.
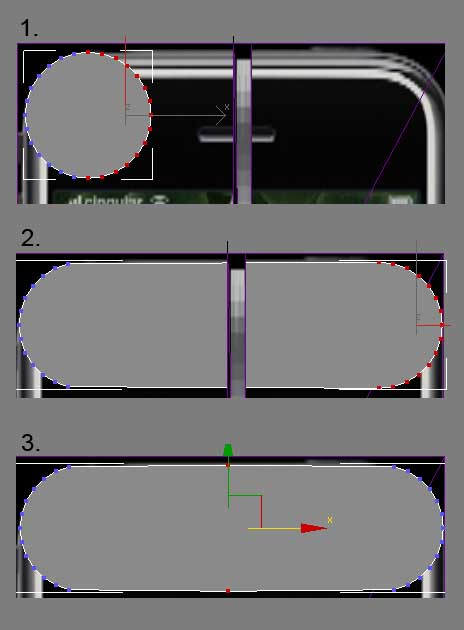
Ok lets get started. Start by creating a cylinder with 28 sides, 5 height segments and 1 on the cap segments. I started with a radius of .35, and a height of -0.35. Yours can be slightly different from this, just create the proper curve of the left iphone corner with the cylinder. It is important to try to match this cylinder’s thickness with the side view (left viewport) of the iPhone before moving on. Also, line it up so it doesn’t go past the silver trim in on the left viewport. You’ll see why on step 3′s image on the next page. Going to your modify tab on the right panel (looks like a blue rainbow) right click on your cylinder and select “Convert To: Editable Poly”. Next, click the Black box with the + sign next to your newly created Editable Poly object to expand it’s sub-object catagories and select the “Vertex”. Select now the vertices as shown (15 of them plus the 15 on the back and middle sections) in the image to the left and drag them to the right so they match with the width of the iphone. When you do this, make sure “Ignore Backfacing” in the selection area of the menu is NOT checked. You’ll notice you have an un-even amount of vertices on either side. Drag back to the center the odd ones so as to even it out. <– See image. Hide the side reference (right click while selected and set to “hide selection”) view if it’s getting in your way for now.
Step 2.
With the same process as step 1. make a selection and selet the points at the bottom of the cylinder. This should be a selection of 15 points aswell (7 on the left, 7 on the right and the one you dragged over to the middle) along with the 15 vertices on the back & middle of the cylinder. Drag the vertices down to match the bottom of the iphone.
———Tip!———–
Here’s a helpful tip. With your object selected…hit the key command on your keyboard Alt + X to turn the object to transparent viewing. This will make it easier to form and shape your object while using a reference image. This can also be reached by selecting the object, right clicking, select “properties” in the pop up menu, and then select “See through” under Display Properties in the Object Properties menu. Try it!
————————–
Once you’ve done that, bring back the two vertices (front pair, middle ones, and back) back up to the middle. When you are finished with this step, you should have something similar to the image on the left here. Move on to the next page to continue…
Step 3.
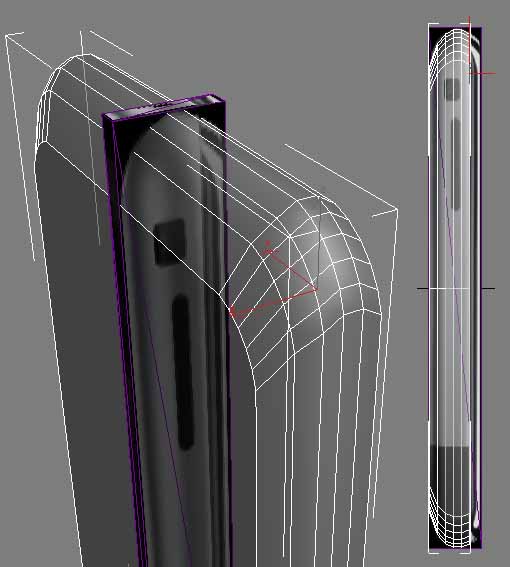
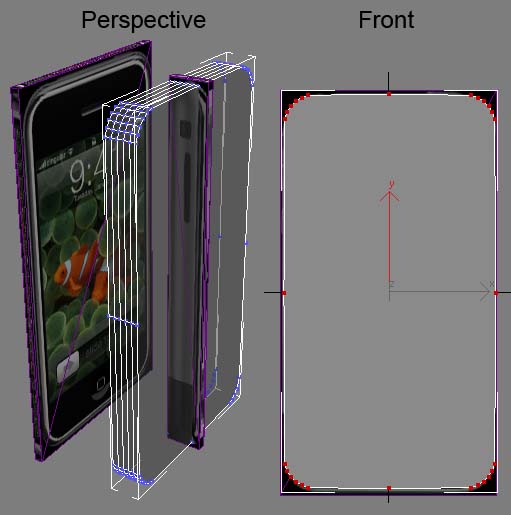
Using Left viewport–
Hit “alt” + “x” and go to invisible mode for your iphone model, and then select the vertices (making sure ignore backface is turned OFF) and match them to fit the curve of the iphone using the Select and Non-uniform scale tool. Make sure to use the inner triangle of the tool when doing this and select all the back vertices, on the top and the bottom, and scale them in. Remember use “control + click” to add to your selection when gathering up the appropraite vertices before this operation. Do the same to the next two rows over and line them up with the curve of the phone. This will give the back section of the phone that nice curve on the back.
Now, using the move tool in the left viewport, select and adjust, row by row, the vertices and move them either up or down and into place to match the curve. The last row up in the very front probably doesn’t need to be adjusted. Also remember, instead of selecting each row all the way from the top and the bottom, in this step you have to select individually the top set of vertices, adjust them, and then work your way to the bottom to adjust those ones. –this will give your iphone model that perfect shape.
Save often!
Step 4.
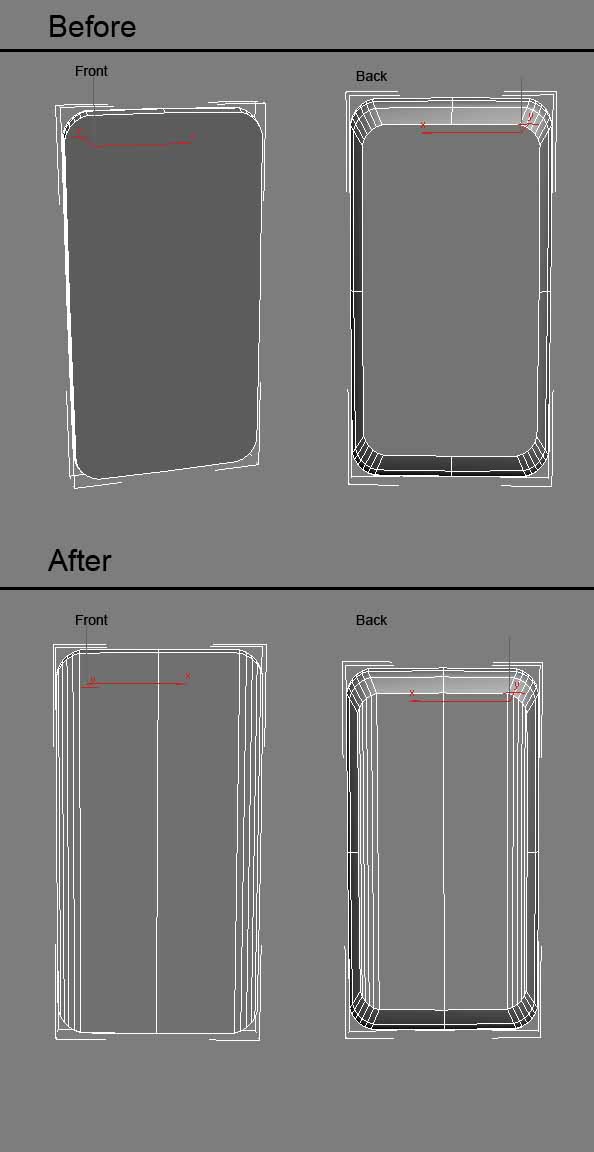 Now it’s time to make some subdivisions to prep this iphone for
smoothing later on. Go to your “Vertex” subobject under the drop down.
Select top middle vertex that’s flush against the face of the model.
Then go down and select the bottom middle vertex that’s flush against
the face of the model. Go over to your modify panel and under “Edit
Vertices” you will see a button called “Connect”. Click that and you’ll
see a brand new edge formed between the two vertices you just selected.
Do this for the right and left side of that front screen area,
selecting a vertex on top, then it’s opposite down there at the bottom,
until you have all of them connected. Then do the same process for the
back of the phone. Take a look at the image to the left here to see a
before and after for the front and back.
Step 5.
For this step all we need to do is subdivide a crossed the iphone so that our vertices on the right and left sides aren’t all alone by themselves. Step 4′s process of using the connect button won’t work for this though because we need to subdivide across pre-made edges. So instead, go to your back viewport, then to your Polygon sub-object mode and look for the “Cut” button down in the modify panel. The Cut button is there under Edit Geometry. To cut, first select the left or right vertex on the back and then drag over to the opposite vertex. Right mouse click to finish the cut and hit the Cut botton once more to de-activate the tool. Then go to your Front viewport and do the same thing to complete the subdivision all away around the model. Take a look at this step’s image here to see this step completed.
Step 6.
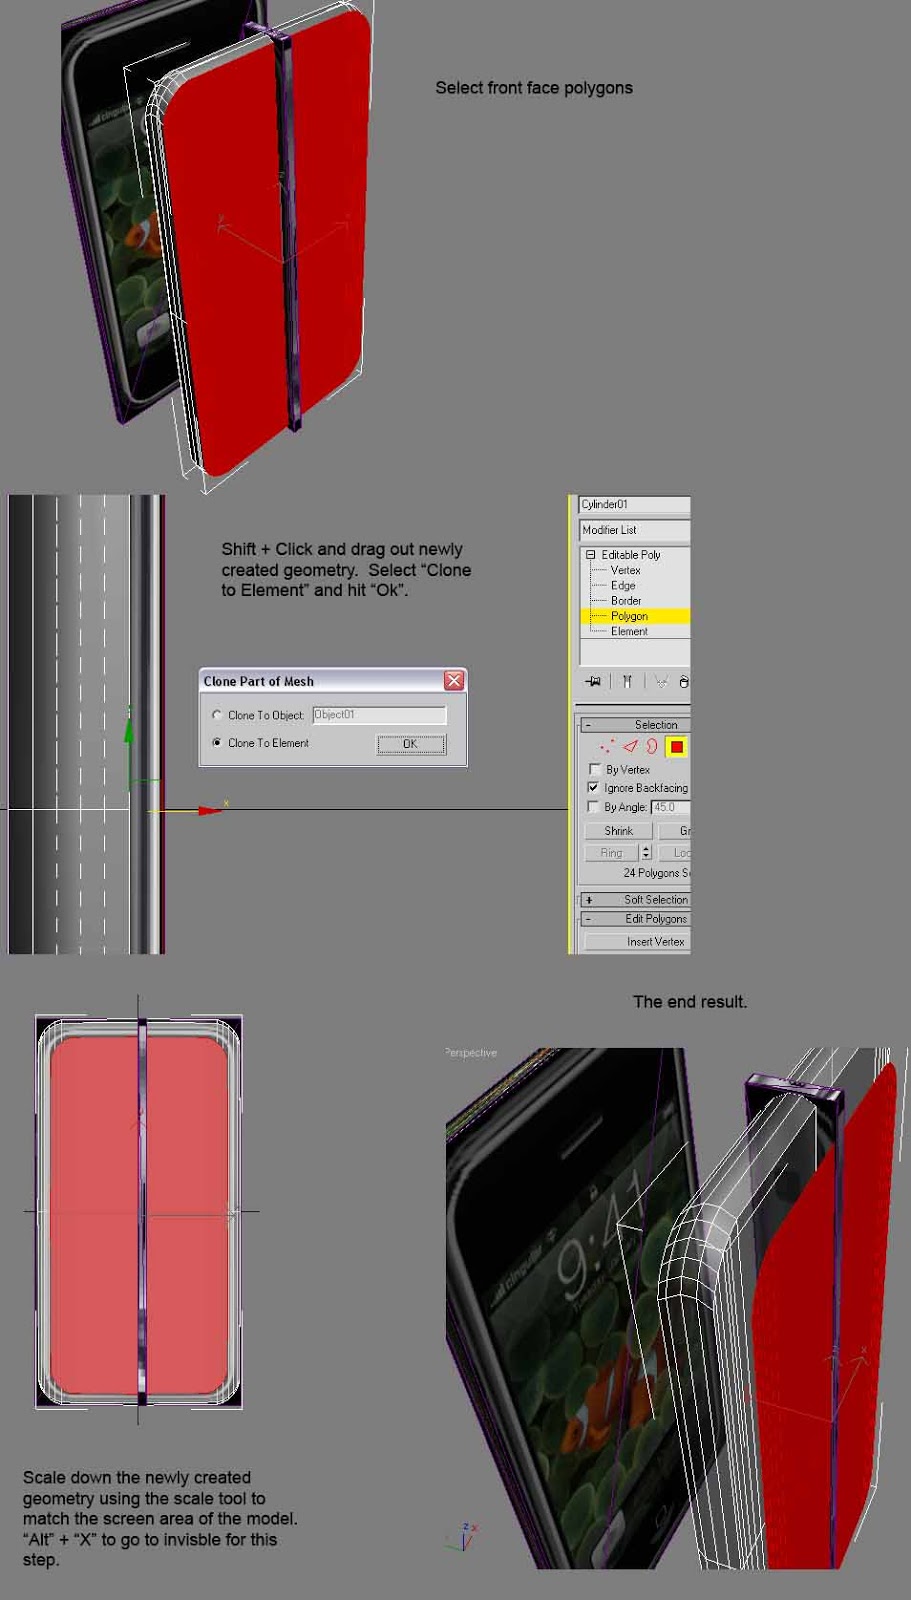 Grab all the polygons that make up the front face/screen area of your
model (using “ignore backfacing” may be helpful here) while your in the
perspective or front viewport. Going to your left viewport after the
polygons are selected, select the move tool and “Shift” click while
moving those polygons to line up with the very front of the iphone.
This is where we’re creating geometry for that front silver trim area.
You’ll notice a menu pop open when you do this giving you two options.
Select the “Clone to Element”. This will keep this new geometry
together with the model even though they are not touching at this point.
Grab all the polygons that make up the front face/screen area of your
model (using “ignore backfacing” may be helpful here) while your in the
perspective or front viewport. Going to your left viewport after the
polygons are selected, select the move tool and “Shift” click while
moving those polygons to line up with the very front of the iphone.
This is where we’re creating geometry for that front silver trim area.
You’ll notice a menu pop open when you do this giving you two options.
Select the “Clone to Element”. This will keep this new geometry
together with the model even though they are not touching at this point.Next, go to the front viewport once more and with the object in “invisible” mode, scale down using the Uniform Scale Tool those newly created polygons to match the screen area. Use the tool to squize in the sides if necessary to fit the screen area and also use the move tool if it will help to line those polygons up. Check in your left viewport and make sure they still line up perfectly with the very front of the model.
Step 7.
Step 8.
Next we need to inset our screen area a bit. Select all the polygons that make up the screen area (making sure not to select the trim or any of the back of the model). Under Polygon subobject mode once again, go down and find the “Inset” button. Next to it is a small box which is the Inset Settings button. Click it and inset at a value of 0.01, and do it by “Inset Type” – Group. Now with those same polygons selected, find the Extrude Settings button (similar to the Inset one) and extrude the polygons at a value of -0.05. Then inset one more time at 0.01.
Step 9.
In this step, we need to prep the phone for the texturing that will be done to it later on. Go to Vertex subobject and grab that middle set of vertices that runs across the middle of the iphone horizontally and drag them down to line up with the black area (bottom of the screen). Now go to Polygon mode and select all the polygons, front, sides and back around the screen area. Do a slice plane operation. You’ll find “Slice Plane” under Edit Geometry in the modify panel. Click that and you’ll see the yellow slice plane operation prepared in your perspective viewport. You can rotate this slice plane before doing the operation, and you can move it as well. Rotate, if necessary, and move it up into position. It doesn’t have to be perfect yet. Then back over to the right click “Slice”. Now you can simply go to Vertex subobject mode, select those vertices and move them into place to match up with the top edge of the screen where the black area meets up with it.
Step 10.
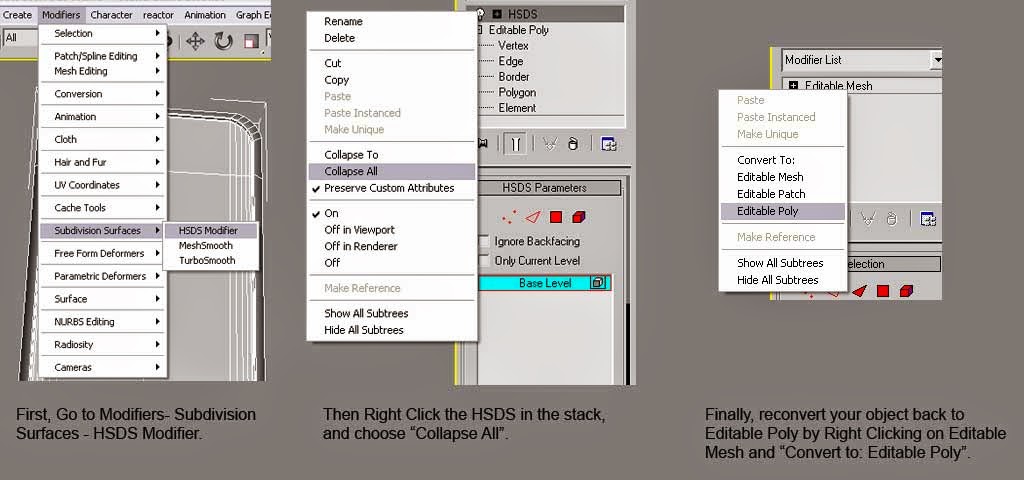 Ok, if you completed the model to this point your doing great! We have
the basic form of the iPhone done. At this time we need to smooth it
out some. Go to your top menu and find “Modifiers”…then “Subdivision
Surfaces” and select the “HSDS Modifier”. Once you have it on top of
your editable poly in the stack (modify panel on the right) your going
to need to collapse all. Right click on the HSDS Modifier and click
“Collapse All”. This is going to automatically change it into an
Editable Mesh. We need to get back to Editable Poly, so right click on
the Editable Mesh and choose “Convert to: Editable Poly”. That gets us
back and ready to go. You’ll also notice if you look at your model, the
harsh edges around the curved areas are now smoothed out.
Step 11.
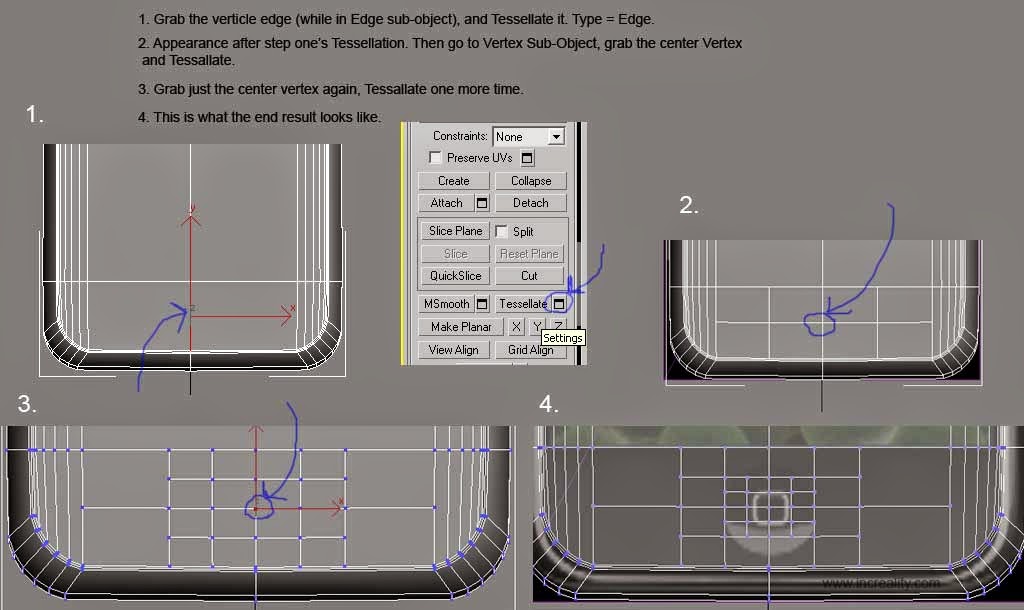 It’s time now to create the mic area of the phone. Yes that complex
inseted area that cuts into the face of the phone at the bottom of the
screen. We’re going to do it with ease though and I’ll show you how
without using Boolean! Ok so first thing we need to do is go to our Edge
sub-object and select the verticle edge going down across the middle of
the mic area. Use your front viewport while doing this and make sure
your object is set to invisible mode (alt + x). Go down your modify
panel and find “Tessellate”. To the right of the Tessellate button,
click the Tessellate Setting button which looks like a black box with a
gray cut out (see image to the left for a visual reference of this).
Tessellate just once, Tessellation Type=Edge, click ok. Then go to your
Vertex sub-object mode and find the center vertex within that
tessellated area. Tessellate it a total of 2 times…each time making sure
to click ok, deselecting the newly created vertices, then grabbing the
center vertex to tessellate. See the image to the left here for a walk
through. Again, we’re only Tessellating 3 times…our first one is while
in Edge sub-object, then two more on that center vertex while in Vertex
sub-object mode.
It’s time now to create the mic area of the phone. Yes that complex
inseted area that cuts into the face of the phone at the bottom of the
screen. We’re going to do it with ease though and I’ll show you how
without using Boolean! Ok so first thing we need to do is go to our Edge
sub-object and select the verticle edge going down across the middle of
the mic area. Use your front viewport while doing this and make sure
your object is set to invisible mode (alt + x). Go down your modify
panel and find “Tessellate”. To the right of the Tessellate button,
click the Tessellate Setting button which looks like a black box with a
gray cut out (see image to the left for a visual reference of this).
Tessellate just once, Tessellation Type=Edge, click ok. Then go to your
Vertex sub-object mode and find the center vertex within that
tessellated area. Tessellate it a total of 2 times…each time making sure
to click ok, deselecting the newly created vertices, then grabbing the
center vertex to tessellate. See the image to the left here for a walk
through. Again, we’re only Tessellating 3 times…our first one is while
in Edge sub-object, then two more on that center vertex while in Vertex
sub-object mode.Step 12.
We need to start forming these newly created edges and vertices from step 11 into a circular form to match up with the circle of the mic. To do this, while in your front viewport and object set to invisible mode, use your back reference image as your guide and start moving the vertices. Try to move them evenly, selecting two opposite vertices at a time if necessary and form them around the mic. See the before and after pic for this step here to the right. Mine doesn’t come out perfect, but it really doesn’t need to be perfect. If you are looking for more of a perfect circle, try using the scale tool while moving two opposite vertices.
Step 13.
Grab the 9 vertices that make up the center of the mic without selecting the outer vertices of the circle. Move over to your left viewport, and drag them in using your move tool. Bring them in to almost touch the verticle line running down the side. Now, move back to the front viewport and select just the very center vertex. Go back to your Left viewport and drag it in just beyond the vertical line. That gives us the inset form of the mic.
Step 14.
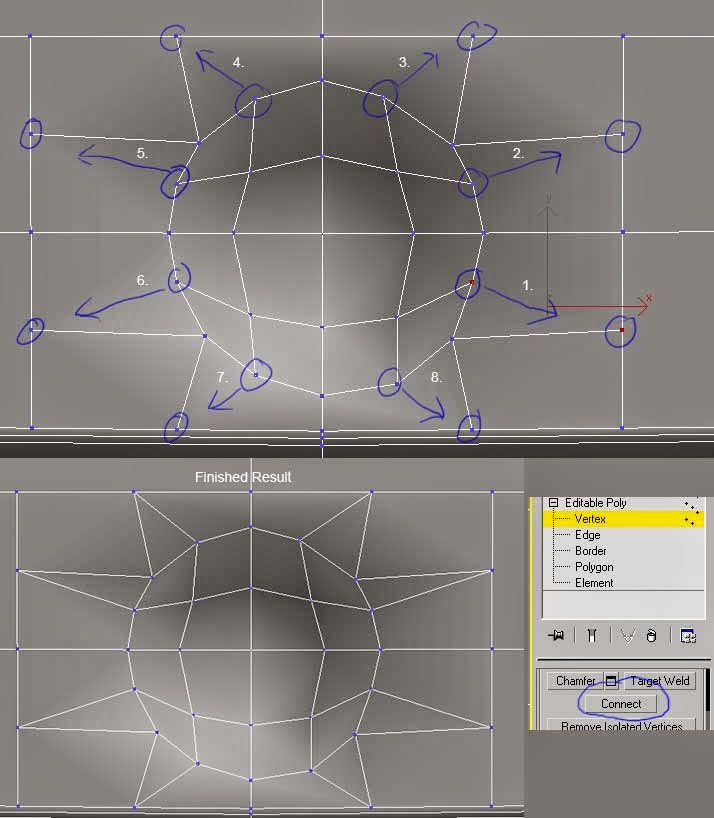 Next we need to connect some vertices. As shown in the image to the
left here, select the pair of vertices labeled “1.” there and go to the
modify panel on the right and hit the “Connect” button. Go through all 8
pairs as labeled in the picture and connect each pair one at a time.
You should have something similar to the image that is labeled “Finished
Result” when you’ve completed this step.
Next we need to connect some vertices. As shown in the image to the
left here, select the pair of vertices labeled “1.” there and go to the
modify panel on the right and hit the “Connect” button. Go through all 8
pairs as labeled in the picture and connect each pair one at a time.
You should have something similar to the image that is labeled “Finished
Result” when you’ve completed this step.Step 15.
This next step will complete our mic area. I’ve created two videos to help walk you through this step. Please click on the videos above to see how the mic is completed. Videos are in youtube format. Make any necessary adjustments to your mic that you feel is desired.
Step 16.
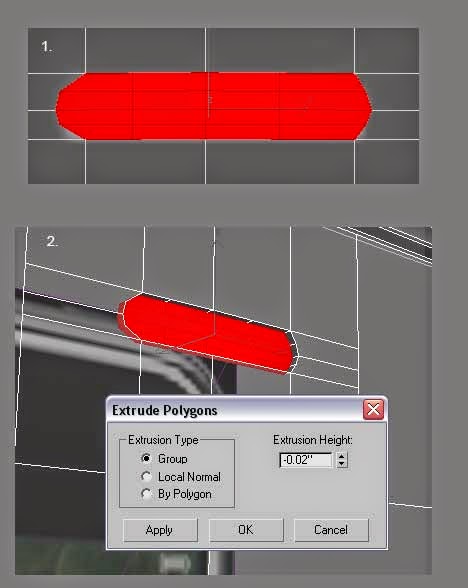
Now we need to create the ear-piece insetting on the top of the screen. This will be a bit easier than the mic area because we don’t need to mess with smoothing it. So first thing we need to do is grab that center vertical edge going across the middle of where the speaker will be. Tessellate it (Type = Edge). Then grab the two outer edges that we don’t need and either hit the “Remove” button or hit “Backspace” on your keyboard to remove them. Next grab the two vertices that are unnecessary and “backspace” to remove them as well. Grab your center vertex (step five in the first image to the left here) and tessellate it. Move the top row of vertices down, then move the bottom row of vertices up to match up with the speaker area. Adjust the center row if desired. Grab that center vertex once more and tessellate it again. Finally adjust the vertices to the left or right on the outer part of the speaker to get a rounded look.
the second image here to the left, grab all the polygons that make up your speaker area. Extrude them with a value of -0.02. Hit ok, and your done with this step.
Step 17. (Optional added detail)
 This step is a bit optional, but recommended. We’ll be adding a bit
more detail to the silver trim of the phone here. Grab the line that
goes all the way down and around the model as shown in the image to the
right. Chamfer that line at a value of 0.005. Then grab the newly
created polygons that are within that chamfer area that wrap all the way
around the model once again. Extrude them at a value of -0.01. Make
sure your Extrusion Type is set to “Local Normal” for this step. That’s
it, you should have some greatly added detail around your trim area.
Step 18.
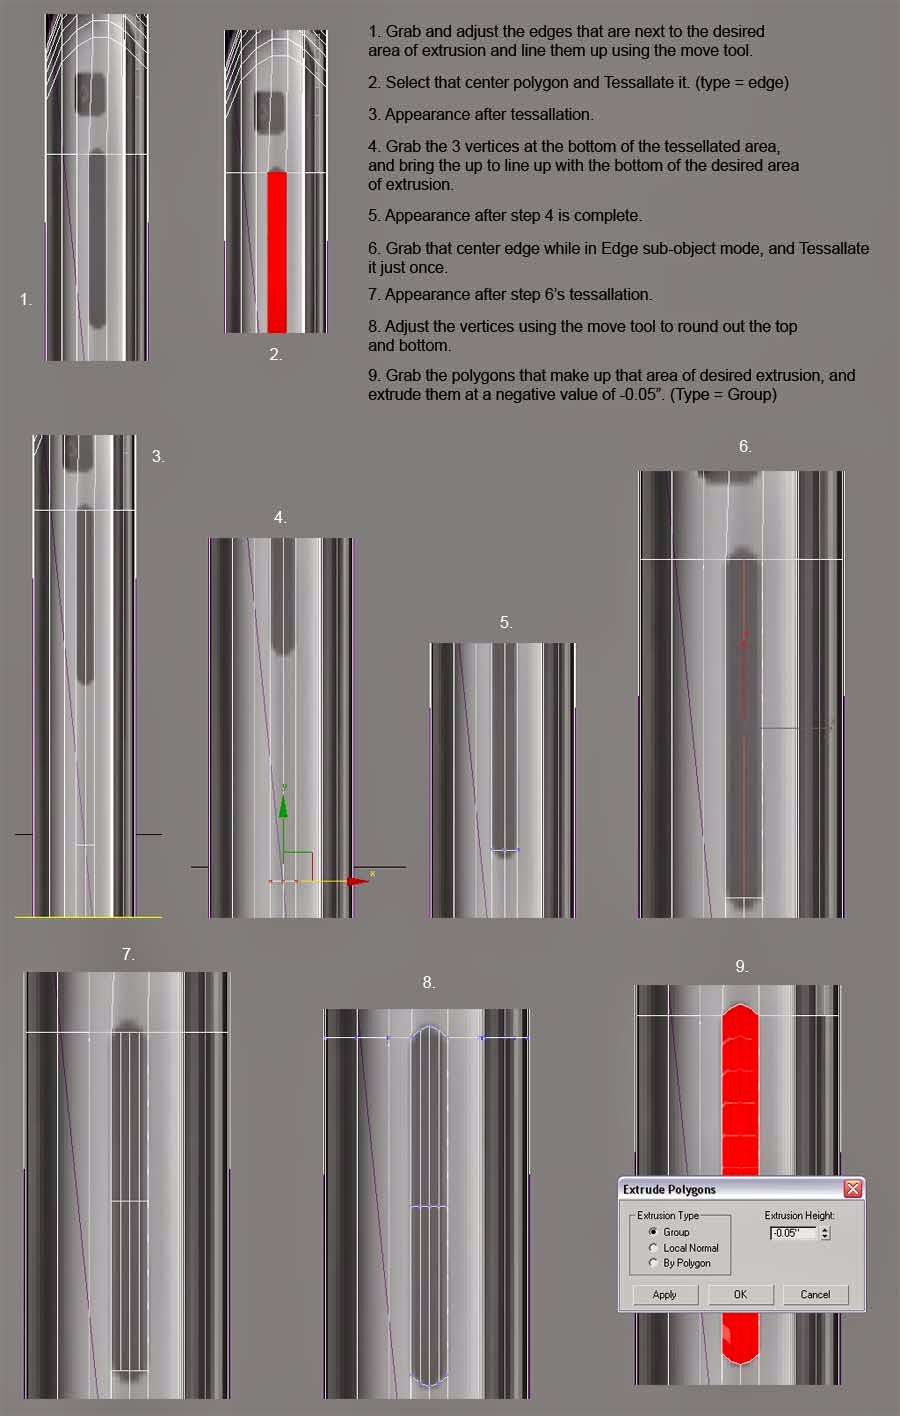
 Now for the side of the model where we find two areas that are inseted.
I’m guessing the top on is to plug in the headphones for the iPhone,
and the bottom one on the side there is for something useful..right?
Anyways, lets get to modeling them. Starting with the bottom lengthy
looking one, grab the two edges that surround that area and adjust them
to line up with the sides. Then select that center polygon where we’re
going to create the groove later and “Tessellate” it once (Type = Edge).
Down below that area a little ways you’ll find three newly created
vertices that appear after tessellating. Grab them and drag them up
just to the bottom of that desired area. Next grab the center edge and
“Tessellate” it just once. Again, Type = Edge. Adjust the top and
bottom vertices so that they match up with the curved parts of this
area. Then grab all the polygons in this area and extrude them with a
negative value of -0.05. That completes this grooved area.
Step 19.
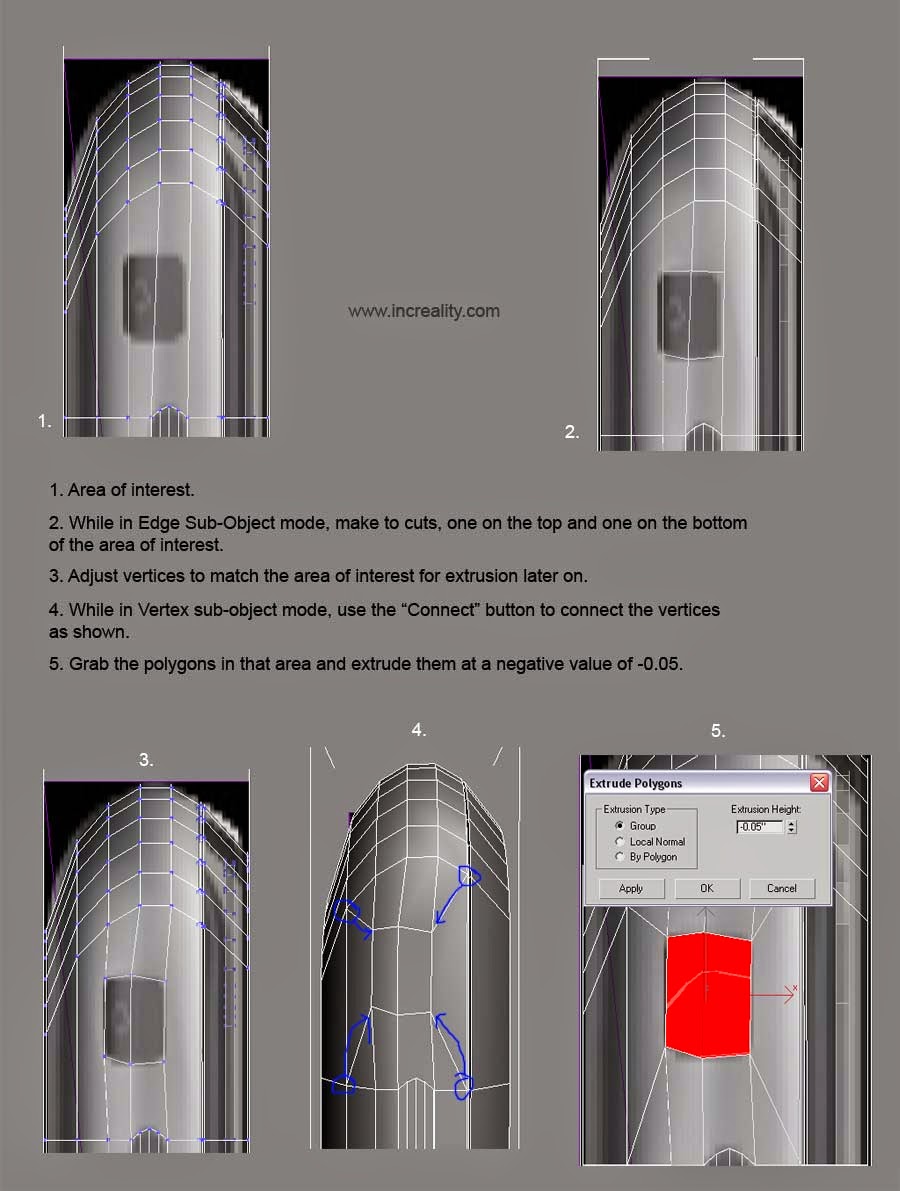
Ok, we’re almost done! Go to your Edge sub-object mode and make two cuts, one on the top and one on the bottom of the headphone jack area. This creates three new vertices on top, and then three on the bottom there. Adjust those vertices to match that area, and then use the connect tool while in Vertex sub-object mode and connect the four pairs of vertices.
Finally, go to Polygons sub-object mode and select all the polygons that make up the headphone jack area. Extrude them with a negative value of -0.05. That’s it! Of coarse, feel free to add any other detail to this area that you would like. Authors’ Final Thoughts:
Ok, that completes this tutorial. There are more areas of detail you could achieve in your own model and I encourage you to explore the possibilities with what you’ve learned here. For instance, I know the bottom of the iPhone has an inseted area where it plugs in similar to the iPod. Now that you know some good techniques for modeling this, play around and see if you can achieve even more detail. Also, be sure to check out the texturing an iPhone tutorial to learn how to texture it. We’ll be going over some other details, how to add the screen, how to add the apple logo on the back and more! I hope you enjoyed this tutorial and found it to be useful. Please feel free to contact me with any comments/questions or suggestions. Thanks! Jesse. This tutorial is (C) 2013 Increality.com If you liked this tutorial, please consider donating. Every little bit helps:


